 Nail trends come and go as with every other element of fashion, and
it can be a hassle going to the salon just to stay up on the latest
trends. But what’s nice is that you can avoid this hassle and save some
money in the process by doing the latest nail trends at home. From
neutrals to neons, here are all the ways you can play up your nails this
summer – and for every summer to come!
Nail trends come and go as with every other element of fashion, and
it can be a hassle going to the salon just to stay up on the latest
trends. But what’s nice is that you can avoid this hassle and save some
money in the process by doing the latest nail trends at home. From
neutrals to neons, here are all the ways you can play up your nails this
summer – and for every summer to come!
Nice and Neutral
In other words: this is how to look classy, chic, and sport a simple trend that is both timeless and easy to achieve. Keep your nails at a comfortable length – but not too long – to keep the elegance and class still intact. Be sure to use an emery board to file each nail into a flattering shape; a nice tip for finding a flattering shape is to follow the shape of your cuticle. With a neutral nail polish of choice, paint your nails and finish up by using a clear top coat to make the finished look last.Choose buttery shades of beige, gray, white, and pale pink to make a neutral statement. The most important thing to remember when wearing a neutral nail color is to keep the colors fresh and well-groomed; this means no chips or scuffs!
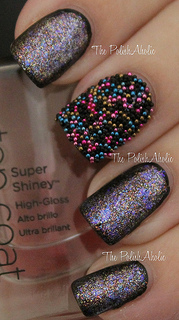
Creating Caviar Manicures
Flickr: Picture by JenPolishAholic
- Base coat
- Opaque or matte nail polish
- Clear micro beads (find them at craft stores)
- Top coat
- A tray or a piece of paper
- The first step is to apply the base coat to clean nails and allow it to dry. Next, you will apply one coat of the non-shimmer nail polish and allow it to dry.
- The second step is to apply another coat of the nail polish to one hand and wait until the polish is tacky (about 10-15 seconds). Holding your hand with the semi-dry nails over the tray, bowl, or piece of paper, pour the clear micro beads over your nails making sure to cover each nail entirely with the beads.
- Once they are covered with “caviar,” use your fingers to gently press the beads to make sure they stay in place.
Nail Stickers that Save Money
Getting straight and tidy lines on your nails can be really troublesome if you’re not using the right tools for the job. So here is the solution for those wondering how to get the perfect striped manicure from home or wanting to create cute geometric shapes on nails without buying expensive stencils or paying to get them done. When reading the following list of tools, keep in mind that scotch tape isn’t just for holding up posters on your wall:- Scissors
- Scotch tape
- Nail polish
Roll out an inch of scotch tape and paint it with your nail polish. Take a shower, do your hair, apply makeup or eat a sandwich – just be sure to let the polish dry before moving on to the next step!
Paint your nails with a different color than you painted the tape, then cut the tape into shapes or strips. Next, create personal and unique designs with your homemade nail stickers by applying them to your nail with the sticky side down. Apply a topcoat to finish the look and make the manicure last!
Color Splash Nail Manicure
Color splashed nails are a hot trend for summer, and it’s a great look to wear to the beach, pool, pond, or walking around the mall. It is really easy and can be done with any combination of colors you have available – assuming they all complement one another. If you want colorful nails that give you instant style you’ll need the following:- White nail polish
- 3 coordinating nail polishes (teal and coral are a couple of great options!)
- 3 toothpicks
- Tray, bowl, or a piece of paper
2. Choose the first color, open the bottle, and use the brush to dab the color onto a tray, piece of paper, or in a bowl. Use your toothpick to pick up some color, then place the colored tip of the toothpick at the upper corner of your finger nail and drag the color to the opposite lower corner of your nail; you’ll probably run out of color before reaching the other corner which is completely fine!
3. Apply as much color as you desire to each nail and let it dry before using your second color – repeating the same process, only using a clean toothpick to apply the new color. Let the nail polish dry before doing the same thing with your last nail color. After your nails have dried, apply a top coat to make sure your style lasts!
The Gradient Stained
This DIY manicure has been popping up everywhere! It’s another great manicure to wear at the beach, pool, parties or day trips to the mall, and it only takes a small part of your day to complete.Ombre and gradient styles are everywhere from hair to clothing so why not stain your nails too! Here are all of the ingredients for this manicure:
- 3-4 nail colors from the same color family (example: dark blue, light blue, pale blue/white)
- Top coat
- Triangle makeup sponge
- Cup of water
- Paint brush
- Polish remover
- Piece of paper
1. The first step is to remove the caps of all 3 nail polishes.
2. Soak the triangle makeup sponge in the water for a couple of seconds and squeeze the water out so that it is only damp. Having a damp sponge will keep the polish from being absorbed heavily into the sponge.
3. Now that your sponge is damp, you’ll need to move slightly fast to keep the nail polish from drying out on the sponge. Begin with the darkest color and draw a line on your sponge near the edge; going over the line twice will be enough for the color to transfer to your nail.
4. The next step is to paint another line with the second shade, continuing to do this with the lightest shade as well.
5. Now you’re ready to dab the sponge onto your nail. It seems intimidating to dab the colors, but fear not! Don’t worry about messing the technique up because dabbing the sponge is what blends the colors together to give it the gradient look. If you’re still unsure, you can dab the sponge on a piece of paper before trying it on your nails. Align the dip of the sponge up with the tip of your finger or toenail. Once the sponge is in place, press the sponge to your nail, and then dab it a few times up and down in the same spot.
You should be able to do 2 nails before needing to reapply the colors to your sponge as long as you’re moving fast. The whole process can get messy, which is why you need the paint brush and fingernail polish remover. Wipe up the mess around your nails and cuticles with the brush before applying a top coat to your nails. Do this manicure in any color you like and mix up the colors if you’re feeling confident.


0 comments:
Post a Comment